Wednesday, October 30, 2013

Blogger's Quilt Festival: Rainbow Zig Zags

For my second blogger's quilt festival submission, I reached way back into my quilting archives for this baby. (First blogged here)

Scott's wedding quilt

I used 8 Kona solids and Kona Snow. If I made it again I wouldn't strip piece it - I had some trouble with strips biasing.

I love the way the colors dance in this quilt, and I would love to make it again!


Blogger's Quilt Festival: Low Volume Log Cabin

This is one of my submissions for Blogger's Quilt Festival. I am so in love with my new quilt! The FWMQG held a low volume challenge this fall, and this was my submission.

low volume log cabin

I am so glad I decided to add some blocks to it to make it throw size, instead of baby size. I love the way it came out, and it is nice to have a new quilt to cuddle under now that it is finally cooling off!

low volume log cabin

I used cool colored squares for the centers of each block, and cut 2.5" strips for the logs. I used some quiet prints from my stash, purchased some, and participated in a swap to receive others.

low volume log cabin

I backed it in one of my favorite prints (an old American Jane alphabet print) with a column of green and blue solids in the center. I quilted around the squares of the log cabin, and bound it with a favorite multi-colored print.

low volume log cabin

Stats: 58"x70"
Machine pieced and machine quilted by me
Finished October 2013

Tuesday, October 29, 2013

G is for Gingham

When I started thinking about G week, I thought of the pink gingham fabric I had recently bought. When I went through patterns and came across my Music Class Blouse pattern, I knew it was a perfect match!

G is for Gingham

This was one time consuming pattern! I also ran into a few problems (of my own failure to cut out all the pattern pieces and trying to use the cuff as the sleeve placket!), but once I had it figured out, it came together perfectly!

G is for Gingham

I ran into a mom at the library who sews and she was asking me if I made Ben and Ellie's outfits that day. When I said yes, and that I had made Samantha's shirt, she was shocked! That is always a great feeling - when it doesn't look mommy-made!

G is for Gingham

This was my first time to add a collar, to do pintucks, to have cuffed long sleeves, and the first time to construct a buttonband like this one. I love that every time I sew an Oliver and S pattern I feel like I learn something!

Monday, October 28, 2013

KCW Day 5 and Wrap Up

On Friday I managed to finish two more pairs of pants for Samantha, and two shirts for the boys!

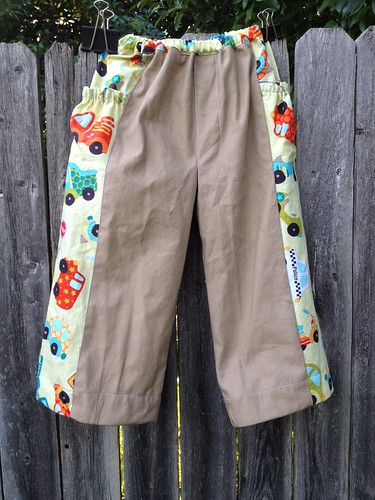
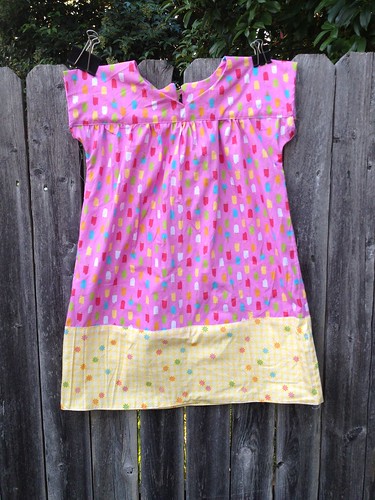
Since I had little to no plan for the week, I decided that I should use some of the pant weight fabric I had purchased at JoAnn's last fall to finally make pants for Samantha. I used the After School Pants pattern from Oliver and S and some crazy fabric! (I figure I can only get her to wear these things for so long, right?)

After School Pants

Untitled

I really like this pattern - easy and straightforward. The dots were a Lisette fabric from a year or two ago. They are a heavy cotton fabric.

After School Pants

After School Pants

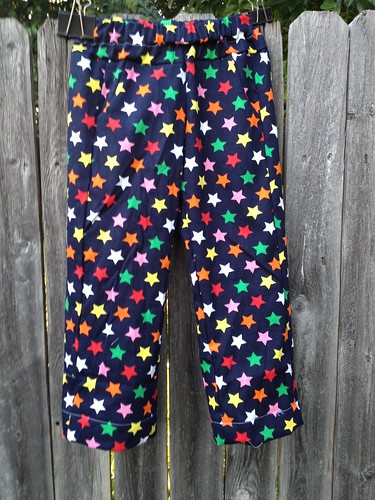
The stars fabric just says made for JoAnn's. It feels like a twill of some sort.

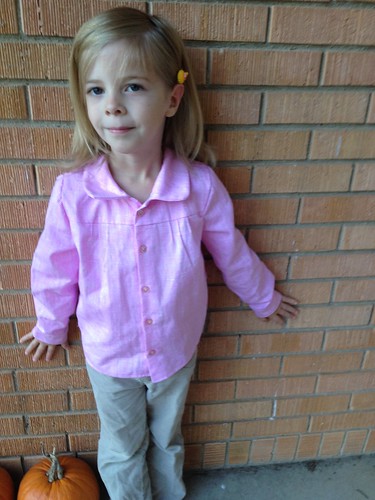
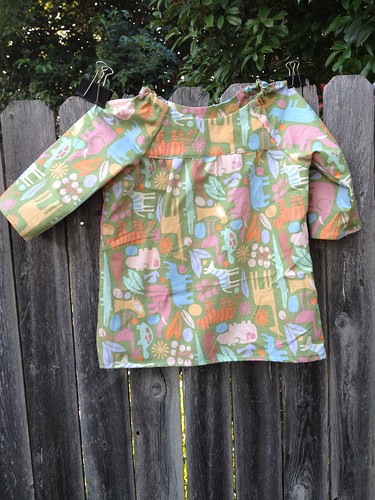
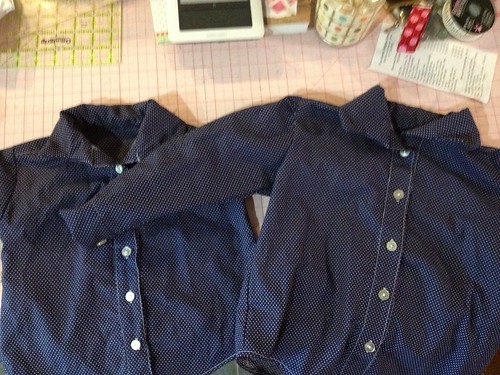
I also was able to get the boys matching Sketchbook Shirts made for our family photo. I used a Michael Miller pindot in navy. It was very difficult to see any marks on the material, so I utilized the wonderful feature of tracing patterns on freezer paper - I ironed the pattern pieces onto the fabric and then cut them out!

Sketchbook shirts

That makes my total for KCW 4 pairs of pants, three dresses, six shirts, five skirts and one Halloween costume. Not as great as in years past, but many of these were time consuming patterns! I need to make some leggings for Ellie, but I'm taking a week off of clothes!

These were far less fussy than Samantha's Music Class blouse (post to come!), and they look so professional! I wasn't able to get a good picture of them, but they turned out great.

Modern Half-Square Triangle Quilt-a-Long Block 60

Welcome! If you are just joining us, information about materials can be found here, and here are the previous blocks: Block 1Block 2Block 3Block 4Block 5Block 6Block 7Block 8Block 9Block 10Block 11Block 12Block 13, Block 14Block 15Block 16Block 17Block 18Block 19Block 20Block 21Block 22Block 23Block 24Block 25Block 26Block 27Block 28Block 29Block 30Block 31Block 32Block 33Block 34Block 35Block 36, Block 37Block 38Block 39Block 40Block 41Block 42Block 43Block 44Block 45Block 46Block 47Block 48, Block 49Block 50Block 51Block 52Block 53Block 54Block 55Block 56Block 57Block 58Block 59.

Block 60


Materials:
8 3.5" squares of Color A
8 3.5" squares of Color B

*note* these are the essential materials for each block, so you can cut several blocks worth of fabric at once to save time!

Create your blocks, following the same procedure as last week. If you need help making your blocks, please see this post. You should end up with 16 2.5" squares. Ready to lay out your block? Here we go!


ROW 1


ROW 2


ROW 3


ROW 4

After you have sewn your squares into rows, press your seams. I like to press odd numbered rows to the left, and even to the right. It helps to use a small piece of paper to number your rows. I like the tiny post-it notes. 

After pressing, you are ready to sew your rows together! Pin, if necessary, but I find that these short rows don't require pinning.

Block 60

Press one final time, and voila! Another finished block! Only 12 to go! Remember to add your blocks to our flickr group!

Please, if you have questions, email me at knitnlit AT gmail DOT com, or make sure you leave your email address in your comment. I've had several folks ask questions in the comments, but if you are a no-reply commenter, I can't email you back.

Friday, October 25, 2013

KCW Day 4

I started off yesterday with very little 'plan.' I knew what I wanted to make this week, but didn't have a plan for each day, like I have in the past. I also didn't have all of my patterns traced and fabric cut like I have before, so that has been taking additional time each day. Since the kiddos were playing nicely, I decided to trace out some Treasure Pocket Pants for Ben.

Car Treasure Pocket Pants

This pair is a light weight twill with some adorable car fabric for the sides and pockets.

Woodland Treasure Pocket Pants

I made these with a remnant of something that feels like a lightweight wool suiting fabric, combined with an adorable Riley Blake woodland print.

Ice Cream Dress

I also remade an Oliver and S Ice Cream Dress using some of the bargain Lisette fabric in the ice cream print.

Class Picnic Blouse

I remade the Class Picnic Blouse as well. This pattern was difficult for me last year (I had trouble with the lining up of the sleeves and bodice and getting the overhang for the elastic casing to be the right size), but was very easy and came together quickly this year! I made this one a bit longer in the body and sleeves, since Samantha is tall and skinny.

Thursday, October 24, 2013

KCW Day 3: Tops

I decided recently that I needed to sew more with knits. I bought a few yards at JoAnn's to try out some different types.

Pauley's Pullover for Ben

For Ben I used this red and black striped knit to sew the Pauley's Pullover from Sewing for Boys. I sewed the 2/3 size, and it is a bit long in the arms and the body is very wide, but he likes it! This knit was fairly thick and very easy to sew.

Bimaa Cowl

For Samantha I used a thin knit to make the Bimaa Cowl. I made the size six, as some of her fives are getting small. However, it is huge! She will have to wear a shirt under it for a while so you can't see her bellybutton from the weight of the cowl! But it is cute, and will fit for a long time. This knit was a pain to sew with - my machine kept wanting to eat it since it was so thin.

After School Shirt

I purchased a yard of this cute Lizzy House print on sale a few weeks ago, with the intention of using it for 'L' week. Samantha wore the one I made last year the other day, and I was reminded of how cute it is. And easy to sew up! I really like the way this one came out - I hope she likes it!

Wednesday, October 23, 2013

KCW Day 2: Easy Peasy!

After my exhaustion of the Family Reunion Dress x2 Monday, I decided to take it easy Tuesday. I had fabric for several skirts for the girls, so I decided to whip those up.

Skirts

There is an 'H' skirt, a 'K' skirt, 'L' skirts and turkey skirts just for fun! (I can't resist some holiday fun!)

I also managed to get Ben's Zebra costume made, now I just need to make him a mane and tail and make Samantha's tail.

Zebra

It's nice to have a big whack of projects completed!

Tuesday, October 22, 2013

KCW Day 1: Family Reunion Dresses

I made two dresses yesterday, though at times it was touch and go! These dresses took a great deal of time and mental capacity, which was hindered by the sick little girl who didn't go to school yesterday. And our general lack of sleep lately didn't help either.

Family Reunion Dresses

But I powered through and I am so pleased with the way they turned out! These are the girls' dresses for our family picture photoshoot coming up in November. I really like the print, which I was unsure of once I started making the dresses.

Family Reunion Dresses

As always, I learn something new with every Oliver and S pattern I sew! I was stymied on the hem facing for these, until I figured out that when you fold the button placket right sides together you pull the facing out of the way. Then it fits fine, but man, that stumped me for a long time! (It didn't help that I sewed the facing to the wrong side of the dress, first, then to the wrong dress next!)

There are a lot of buttons on these dresses, but they are so cute! I love that they button all the way up the back. And the pleats/collar/facing/button placket are adorable all together and add a touch of fancy without being too much.

Family Reunion Dresses

I'm taking a brain break today - some simple skirts and a Halloween costume on deck. I've got two more Oliver and S time consuming patterns to make hopefully this week - two Sketchbook Shirts for the boys for our family picture.

I'm planning some Treasure Pocket Pants for Ben, a Bimaa Cowl sweater for Samantha and an Ice Cream Dress as well. I've got several other things lined up if time allows -we will see!

Monday, October 21, 2013

Modern Half-Square Triangle Quilt-a-Long Block 59

Welcome! If you are just joining us, information about materials can be found here, and here are the previous blocks: Block 1Block 2Block 3Block 4Block 5Block 6Block 7Block 8Block 9Block 10Block 11Block 12Block 13, Block 14Block 15Block 16Block 17Block 18Block 19Block 20Block 21Block 22Block 23Block 24Block 25Block 26Block 27Block 28Block 29Block 30Block 31Block 32Block 33Block 34Block 35Block 36, Block 37Block 38Block 39Block 40Block 41Block 42Block 43Block 44Block 45Block 46Block 47Block 48, Block 49Block 50Block 51Block 52Block 53Block 54Block 55Block 56Block 57Block 58.

Block 59


Materials:
8 3.5" squares of Color A
8 3.5" squares of Color B

*note* these are the essential materials for each block, so you can cut several blocks worth of fabric at once to save time!

Create your blocks, following the same procedure as last week. If you need help making your blocks, please see this post. You should end up with 16 2.5" squares. Ready to lay out your block? Here we go!


ROW 1


ROW 2


ROW 3


ROW 4

After you have sewn your squares into rows, press your seams. I like to press odd numbered rows to the left, and even to the right. It helps to use a small piece of paper to number your rows. I like the tiny post-it notes. 

After pressing, you are ready to sew your rows together! Pin, if necessary, but I find that these short rows don't require pinning.

Block 59

Press one final time, and voila! Another finished block! Only 13 to go! Remember to add your blocks to our flickr group!

Please, if you have questions, email me at knitnlit AT gmail DOT com, or make sure you leave your email address in your comment. I've had several folks ask questions in the comments, but if you are a no-reply commenter, I can't email you back.

Friday, October 18, 2013

F is for Flowers and Fuchsia

For F week I was so excited to use this floral print! I've been hoarding it for a few years, wanting to use it on the perfect project. Samantha had asked me to make a matching dress for Ellie this time, so I paired it with the fuchsia dots, to maximize the yardage I had. I used the Sasha Jumper pattern again, (previously made here and here). This is a great simple dress that is very versatile - my girls wear them in the summer and with shirts and leggings when it's cooler.

F is for flowers and fuchsia

We picked out cute flower buttons for the back. This is one of those dresses I know will get worn and worn again!

Flowers back

Kid's Clothing Week is next week, and I'm hoping to knock out H and I (G is done!), and work on the kids' clothes for our family pictures next month. I need to plan some shirts and pants for Ben as well! Poor guy is getting the short end of the stick lately!

Tuesday, October 15, 2013

Finished Knits

It's about time I posted some new finished knitting projects! These were all knit for class samples, and I love the way they came out! Now to have time to knit them for myself!

Gradient Cowl

First up is Gradient. Knit out of three skeins of Cascade 220 Superwash Sport, this was a fun knit! I knit the three color version, but only did the cowl.

Wee Austin Hoodie

Wee Austin Hoodie was a cute quick knit. I would love to make one of these for my kiddos!

Lollipop Skirt

The Lollipop Skirt is adorable, and I know two girls who would love their own! I love the cute ridges on the skirt and it is very twirly!

Brick Road Cowl

The Brick Road Cowl was an enjoyable easy knit - I think this would make a fun gift for someone! I love that it is reversible!

I have several more projects for upcoming classes on the needles - just need more time in the day to finish them!

Monday, October 14, 2013

Modern Half-Square Triangle Quilt-a-Long Block 58

Welcome! If you are just joining us, information about materials can be found here, and here are the previous blocks: Block 1Block 2Block 3Block 4Block 5Block 6Block 7Block 8Block 9Block 10Block 11Block 12Block 13, Block 14Block 15Block 16Block 17Block 18Block 19Block 20Block 21Block 22Block 23Block 24Block 25Block 26Block 27Block 28Block 29Block 30Block 31Block 32Block 33Block 34Block 35Block 36, Block 37Block 38Block 39Block 40Block 41Block 42Block 43Block 44Block 45Block 46Block 47Block 48, Block 49Block 50Block 51Block 52Block 53Block 54Block 55Block 56Block 57.

Block 58


Materials:
8 3.5" squares of Color A
8 3.5" squares of Color B

*note* these are the essential materials for each block, so you can cut several blocks worth of fabric at once to save time!

Create your blocks, following the same procedure as last week. If you need help making your blocks, please see this post. You should end up with 16 2.5" squares. Ready to lay out your block? Here we go!


ROW 1


ROW 2


ROW 3


ROW 4

After you have sewn your squares into rows, press your seams. I like to press odd numbered rows to the left, and even to the right. It helps to use a small piece of paper to number your rows. I like the tiny post-it notes. 

After pressing, you are ready to sew your rows together! Pin, if necessary, but I find that these short rows don't require pinning.

Block 58

Press one final time, and voila! Another finished block! Only 14 to go! Remember to add your blocks to our flickr group!

Please, if you have questions, email me at knitnlit AT gmail DOT com, or make sure you leave your email address in your comment. I've had several folks ask questions in the comments, but if you are a no-reply commenter, I can't email you back.