Friday, May 31, 2013

Hunter's Race Car Quilt

My nephew recently turned three, and moved into a big boy bed. I asked my sister if he needed a big boy quilt to go along with that bed and we got our wheels turning. Literally! He is big into race cars, and Lightning specifically. My sister found this quilt and another like it on Pinterest and asked if I could make something like that. Turns out they used a pattern from Denyse Schmidt Quilts, and I had the book! Hubby blew up the template pieces for me at work, and my sister ordered a bunch of fabric with race cars on it. We used a Michael Miller black and white pindot for the road, and a big rainbow dot print for the back.

hunters

This was my first time making a template with curves. I found it difficult to cut them out without cutting the template. After too many nicks in the template, I finally decided to trace all the pieces and cut them out with scissors. It definitely took longer, but was less stressful in the long run.

photo 1

It took much longer to pin all the curves together than it did to sew them together, but all the pinning was worth it! They came out great and laid flat with no clipping and very very few puckers (that were entirely my fault).

When I trimmed the blocks down I did find that some parts of my road no longer matched up - the large corner curves didn't always match the 'straight' curves. I couldn't finagle them to fit either - the blocks are so large that moving one enough to make the road match meant that it didn't match up to the next side.

close up car quilt

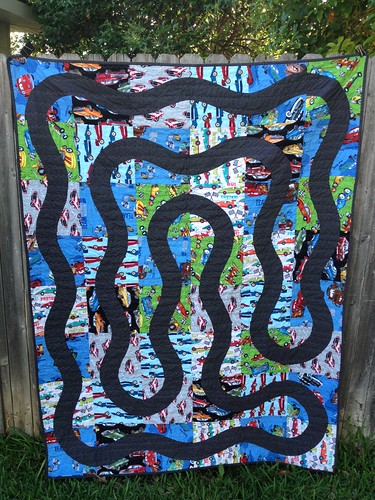
With hubby's help, we figured out how to lay out the blocks so that it was one continuous road. I had to make two more corner pieces for it to work, but that was no big deal! I quilted it with a wavy stitch to mimic the curves of the road.

photo 3

I made a label using a Sublime Stitching transfer and put his and my names on it, with the year. I hope he loves it, and that my sister doesn't blame me when he is up past his bedtime driving cars on his bed! :)

Thursday, May 30, 2013

Charity Quilts

As part of the FWMQG, we are collecting quilts for the kids at the YWCA daycare to use as napmats. Many of the children who participate in their daycare are homeless, and this is a nice way for them to have something handmade, with love, to rest upon. They are currently napping on towels, so I am so excited for us to be giving these to them!

I made two quilts - I had the girl quilt top done, then my mom of boys guilt got to me, and I had to make one for boys to use too!

girlcharity

The girls quilt features a number of leftover prints from Samantha's big girl quilt, and a lot of other scraps I thought were 'girly.'  I cut squares into different widths - 2", 3" and 4", and sewed vertical rows together. I quilted it using vertical straight lines.

boycharity

The boy's quilt features a number of leftover prints from making Samantha's best friend's quilt (which I finally have a picture of - hopefully I will get a post up about that one this week!), and some other scraps leftover from taggies and burp cloths from my etsy shop. I trimmed all the blocks to the same height, and sewed rows together. I quilted this one with horizontal straight lines.

Both quilts measure about 24"x36". We had to machine sew the binding on for extra sturdiness, and it was good practice for me! I am glad to have these checked off my to do list!

Wednesday, May 29, 2013

WIP Wednesday

I've been missing WIP Wednesday these last few weeks. Seems I would forget to blog or not having anything I could share. However, I now find myself with plenty of projects! I have Ellie's quilt top done and Ben's nearly done, but I won't be quilting those until after baby gets here-just can't get motivated to baste and quilt two queen size quilts three weeks before I give birth! 

In light of our impending arrival, and a few upcoming deadlines, I decided I would start cutting fabric for a few new quilts. I know it will be very difficult to press down to cut fabric after giving birth, so I am using that as an excuse to kickstart a few projects. :) Maybe a few too many projects. More details as these actually start to become things other than piles of fabric, but there my negative space challenge and low volume challenge from the FWMQG are in there and I started cutting a Tokyo subway map quilt finally! I am really excited about that one, though I have lots more cutting to do! 


Tuesday, May 28, 2013

Modern Half-Square Triangle Quilt-a-Long Block 38

Welcome! If you are just joining us, information about materials can be found here, and here are the previous blocks: Block 1Block 2Block 3Block 4Block 5Block 6Block 7Block 8Block 9Block 10Block 11Block 12Block 13, Block 14Block 15Block 16Block 17Block 18Block 19Block 20Block 21Block 22Block 23Block 24Block 25Block 26Block 27Block 28Block 29Block 30Block 31Block 32Block 33Block 34Block 35Block 36, Block 37.

photo


Materials:
8 3.5" squares of Color A
8 3.5" squares of Color B

*note* these are the essential materials for each block, so you can cut several blocks worth of fabric at once to save time!

Create your blocks, following the same procedure as last week. If you need help making your blocks, please see this post. You should end up with 16 2.5" squares. Ready to lay out your block? Here we go!


ROW 1


ROW 2


ROW 3


ROW 4

After you have sewn your squares into rows, press your seams. I like to press odd numbered rows to the left, and even to the right. It helps to use a small piece of paper to number your rows. I like the tiny post-it notes. 

After pressing, you are ready to sew your rows together! Pin, if necessary, but I find that these short rows don't require pinning.

photo

Press one final time, and voila! Another finished block! Only 35 to go! Remember to add your blocks to our flickr group!

Please, if you have questions, email me at knitnlit AT gmail DOT com, or make sure you leave your email address in your comment. I've had several folks ask questions in the comments, but if you are a no-reply commenter, I can't email you back. 


Sunday, May 26, 2013

Modern HST QAL

Just wanted to let you all know that tomorrow's post will be up late. The stomach bug is at our house and I seem to have been hit the hardest. Blech! I'll do my best to get it up tomorrow night. Thanks for understanding!

Thursday, May 23, 2013

Quiet Games

Several weeks (months?) ago I pinned this pin. I thought it would be perfect for car rides and other times when the kids needed to have a quiet activity. When my niece's birthday rolled around a few weeks back, I thought of this as a gift, since she was having a baby sister soon (who was born last week! Yay for being an aunt again!), and would need something quiet to do while mommy fed the baby and rested.

I bought a bunch of wool felt from Madtosh, (which is so nice - I now will only use crappy felt for things that may be torn up - ie: costumes and such), and planned out which activities I wanted to do.

Fish

Ice Cream Cones

I've heard that the ice cream one is her favorite!

Tree

For the tree I made several different colors of leaves, so the tree can have seasons as she gets older and understands that.

Rainbow

I think the rainbow is my favorite!

Flowers

Butterflies

I really like the flowers and butterflies as well.

I didn't use a pattern for any of these - for the ones I was worried about coming out the right size to fit on the half sheets of felt (I cut all the backgrounds into half sheets), I made a paper template first (butterfly, tree trunk). I added embellishments I thought a two-year old could handle. And if tiny pieces get lost, they are easily replaced!

I packaged each set of pieces into snack size ziploc bags (the butterflies did have to use a sandwich isze bag - their wings were too big for the smaller bag), labeled with what pieces belonged in them. Then I put all of the backgrounds and small bags into a gallon sized bag. This way she can have out one activity at a time. And some of the backgrounds have things glued down - the tree, the butterfly body, the sand, the ice cream cone, while the others have mostly moving parts. I tried to glue something on each background so they could tell which activity it was.

Samantha has already requested a set for our house - guess I need to buy more wool felt!

Tuesday, May 21, 2013

Teacher Gifts

Teacher appreciation week was just a few days ago, but our last day of school is tomorrow already! I can't believe it, and I'm not sure I'm ready for being 35 weeks pregnant with three kids home all day every day, but we'll make it through!

I didn't get my teacher appreciation gifts posted here before the end of teacher appreciation week, but these would make great end of the year gifts for the teachers in your life too!

notebooks

I used Teri's pattern from Pretty in Patchwork Holidays to make these. I also didn't use fusible fleece or fusible interfacing, because I didn't have any. I used quilt batting and sew in interfacing, and they worked just fine. I also used regular elastic for the closure instead of a hair tie. Cute pattern - and these came together pretty quickly! I couldn't find lined notepads, so I used plain white 'scratch' pads instead, but I think they're fine!

notebooks2

For their end of the year gifts I chose to use Poochie Bag pattern, which was fast and easy! I did topstitch around the top of my bag because I love topstitching! I filled these with homemade chocolate chip cookies and a reusable water bottle with those small packets of iced tea. I hope they will find their treats enjoyable!

teachers

The best thing about these gifts? All of my kids will have different teachers next  year so I can make these all over again! :)  But I'd love some new ideas - what are you making/giving for teacher appreciation gifts?


PS - How are you all feeling about the new Flickr makeover? I can't figure out how to rotate my pictures which Flickr chose to upload most of sideways. Argh!!!

Monday, May 20, 2013

Modern Half-Square Triangle Quilt-a-Long Block 37

Welcome! If you are just joining us, information about materials can be found here, and here are the previous blocks: Block 1Block 2Block 3Block 4Block 5Block 6Block 7Block 8Block 9Block 10Block 11Block 12Block 13, Block 14Block 15Block 16Block 17Block 18Block 19Block 20Block 21Block 22Block 23Block 24Block 25Block 26Block 27Block 28Block 29Block 30Block 31Block 32Block 33Block 34Block 35Block 36. 

photo 1


Materials:
8 3.5" squares of Color A
8 3.5" squares of Color B

*note* these are the essential materials for each block, so you can cut several blocks worth of fabric at once to save time!

Create your blocks, following the same procedure as last week. If you need help making your blocks, please see this post. You should end up with 16 2.5" squares. Ready to lay out your block? Here we go!


ROW 1


ROW 2


ROW 3


ROW 4

After you have sewn your squares into rows, press your seams. I like to press odd numbered rows to the left, and even to the right. It helps to use a small piece of paper to number your rows. I like the tiny post-it notes. 

After pressing, you are ready to sew your rows together! Pin, if necessary, but I find that these short rows don't require pinning.

photo 1


Press one final time, and voila! Another finished block! Only 35 to go! Remember to add your blocks to our flickr group!

Please, if you have questions, email me at knitnlit AT gmail DOT com, or make sure you leave your email address in your comment. I've had several folks ask questions in the comments, but if you are a no-reply commenter, I can't email you back. 


Sunday, May 19, 2013

Blogger's Quilt Festival: Paintchip Quilt

Welcome to my entry for the Blogger's Quilt Festival! I am so excited to share this quilt with you - it is one of my favorites!

Paintchip Quilt

Many moons ago I was inspired by this quilt from Kati at From the Blue Chair. But I wanted more of a random color assortment. I also really wanted to use the wonderful Ombre prints from Simply Color.

photo 3

I laid out the fabric and figured out that if I cut 2.5" squares, each square would 'read' as it's own color. So I purchased half yards of each color, and chopped them all up!

See previous posts about this quilt here, here,  and here.

photo 2

I could not be more pleased with how this turned out! I chose to quilt it through every other square using light grey thread. I backed and bound it with Kona Medium Grey - I debated using a print, but decided that the front was so busy it needed a quiet back.

I love this quilt, and sort of (crazily!) want to make another one! I love small simple patchwork, and this was a great project for chain piecing and simple mindless sewing!

Paintchip Quilt

I hope you'll stop by the festival and vote for my quilt! :) (Link at the top of this post!) (Now ends our shameless self promotion!)

Monday, May 13, 2013

Modern Half-Square Triangle Quilt-a-Long Block 36

Welcome! If you are just joining us, information about materials can be found here, and here are the previous blocks: Block 1Block 2Block 3Block 4Block 5Block 6Block 7Block 8Block 9Block 10Block 11Block 12Block 13, Block 14Block 15Block 16Block 17Block 18Block 19Block 20Block 21Block 22Block 23Block 24Block 25Block 26Block 27Block 28Block 29Block 30Block 31Block 32Block 33Block 34Block 35.

block 36


Materials:
8 3.5" squares of Color A
8 3.5" squares of Color B

*note* these are the essential materials for each block, so you can cut several blocks worth of fabric at once to save time!

Create your blocks, following the same procedure as last week. If you need help making your blocks, please see this post. You should end up with 16 2.5" squares. Ready to lay out your block? Here we go!


ROW 1


ROW 2


ROW 3


ROW 4

After you have sewn your squares into rows, press your seams. I like to press odd numbered rows to the left, and even to the right. It helps to use a small piece of paper to number your rows. I like the tiny post-it notes. 

After pressing, you are ready to sew your rows together! Pin, if necessary, but I find that these short rows don't require pinning.

block 36


Press one final time, and voila! Another finished block! Only 36 to go! We are halfway done!!! Pat yourself on the back! Remember to add your blocks to our flickr group!

Please, if you have questions, email me at knitnlit AT gmail DOT com, or make sure you leave your email address in your comment. I've had several folks ask questions in the comments, but if you are a no-reply commenter, I can't email you back. 


Tuesday, May 07, 2013

Pouches

So after I made some zippered pouches back at Christmas I knew I wanted to make more! My LYS wanted some new varieties to sell, so I made some for them. Since then I've made some special requests for customers, and worked on refining some different things about them. I think I've pretty much got them the way I want them, so now I am going to experiment with different sizes-big enough for large projects and some smaller notion sized bags. I am enjoying getting better at zipper installation! :)


Monday, May 06, 2013

Modern Half-Square Triangle Quilt-a-Long Block 35

Welcome! If you are just joining us, information about materials can be found here, and here are the previous blocks: Block 1Block 2Block 3Block 4Block 5Block 6Block 7Block 8Block 9Block 10Block 11Block 12Block 13, Block 14Block 15Block 16Block 17Block 18Block 19Block 20Block 21Block 22Block 23Block 24Block 25Block 26Block 27Block 28Block 29Block 30Block 31Block 32Block 33Block 34.


block 35


Materials:
8 3.5" squares of Color A
8 3.5" squares of Color B

*note* these are the essential materials for each block, so you can cut several blocks worth of fabric at once to save time!

Create your blocks, following the same procedure as last week. If you need help making your blocks, please see this post. You should end up with 16 2.5" squares. Ready to lay out your block? Here we go!


ROW 1


ROW 2


ROW 3


ROW 4

After you have sewn your squares into rows, press your seams. I like to press odd numbered rows to the left, and even to the right. It helps to use a small piece of paper to number your rows. I like the tiny post-it notes. 

After pressing, you are ready to sew your rows together! Pin, if necessary, but I find that these short rows don't require pinning.

block 35

Press one final time, and voila! Another finished block! Only 37 to go! Pat yourself on the back! Remember to add your blocks to our flickr group!

Please, if you have questions, email me at knitnlit AT gmail DOT com, or make sure you leave your email address in your comment. I've had several folks ask questions in the comments, but if you are a no-reply commenter, I can't email you back.